There are affiliate links in this post. This means I may get a few cents to help pay for this blog if you order but it won't cost you a thing.
Making Christmas ornaments is a big part of my preparations for the season each year. I love crafting and the fun of adding to my tree with ornaments that cannot be found in the big box stores. Today, I am going to share my latest ornament with you - a vintage book page snowflake decoration. I am using it as a Christmas ornament on my tree this year but these could be used in many ways - hanging in your windows, from a light fixture, added to a length of twine for a banner - so many different ways it can be used.
I love book page crafts so it's no surprise that this one is a favorite of mine. It's very simple to do and you can make several while watching a favorite movie or having afternoon coffee with a friend. And, the fact that it's so versatile makes it one anyone can use in any decor. It can also be used in your winter decor right through January, February, and March.
DIY Vintage Book Page Snowflake Decoration
You will need:
- old book pages
- scissors
- staples and stapler
- hot glue gun and glue sticks
- gold glitter glue
- gold snowflake ornaments ( I got mine at Walmart- 20 in a box for about $2)
So, grab a cup of coffee, a comfy seat and let's get started. By the way, my 8 year old grand daughter helped me make these - so it's actually a simple enough craft that kids would love to make them also.
I used an old torn up paperback book headed for the trash. I have several of these I dumpster dived for so I can cut them up without feeling guilty about it. This one has that revered brown colored edging that is so vintage looking.
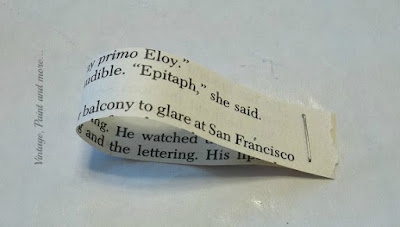
The first step is to cut the page into 1/2" strips crosswise - I found that was about every 4 lines on the print of my pages.
Loop each strip and staple the ends together. This is where my granddaughter performed her very important task.
Next, I connected two loops together. I found the easiest way to do this was to hot glue two loops together at the stapled end. I made 6 sets of two glued loops for each snowflake.
Then I glued two of these together on one side of the loopy end as above. This way they made the open flower effect I was looking for.
Continue to do this with 6 sets of loops. Then glue the last set together to form a complete circle or flower. Don't worry about the center - you are covering it up with a snowflake.
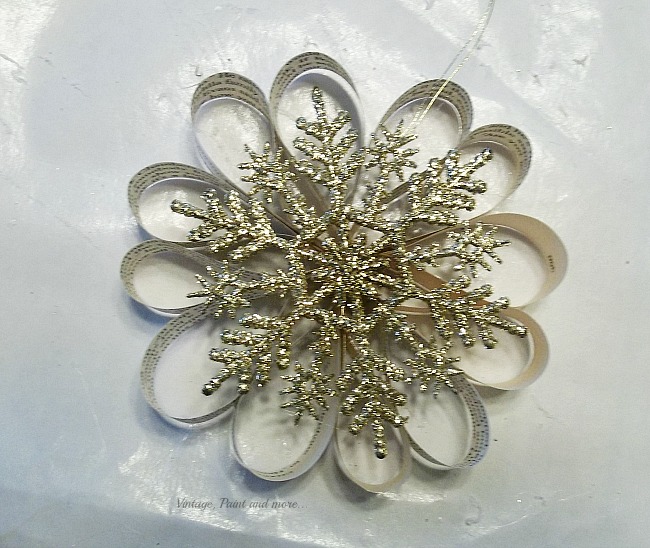
Glue one of your snowflakes to the center of the loopy circle/flower. I did not add any ribbon for hanging because the snowflakes had a string on them to hang and it was perfect. But, if you do not have that now would be a good time to add a ribbon or gold string to hang it by.
I felt they were just not glitzy enough so I added some glitter glue just around the edges of each of the paper loops to match the glitz of the snowflake. That was the perfect touch I needed for the look I was going for. You may like it without.
And, here it is hanging on the tree. So pretty - I love the vintage look of it. But, then it's book pages and gold and glitz -what's not to love about it?
Think you might like to try some of these? So, simple and you can get the kids involved in making them...
Until next time
have a great day and get out there and create
something you love.....
I will be linking up to the parties listed on the Where I Party page. Please be sure to go by and visit each one as they are filled with great projects and inspiration.If you liked this project you may also like these:
DIY Ornament Wreath
Multipurpose Gift Wrap
DIY Wooden Snowman


You make that look so easy.
ReplyDeleteCute! I love the up cycled paper usage. Hopping over from Hankful House party.
ReplyDeleteBeautiful ornament! There are so many projects using book pages out there, but this one is really unique. I love the addition of the glittery snowflake on the front!
ReplyDeleteSo pretty! Found you from Whimsy Wednesday. Love this simple craft!
ReplyDeleteSo cute! I hope you will share your ornament on Thank Goodness It's Thursday @ http://www.jordansonion.blogspot.com - the party goes live on Thursday at 10 AM MST
ReplyDeleteHi I'm Connie at http://hotflashncraftn.blogspot.com a new GFC friend. I love this ornament, so easy, so elegant. Thanks for sharing.
ReplyDeleteI love a good book page project! So pretty! Thanks for linking up to the "Get Your DIY On" link up party! Bring your handmade project on Sunday! :)
ReplyDeleteThank you so much for sharing your fantastic project on The Inspiration Board at homework. I featured you today! Have a great weekend.
ReplyDeletecarolyn
homework
So pretty Cathy!
ReplyDeleteBeautiful! Nice work.
ReplyDeleteCathy, I think you've inspired me to make my very first bookpage project! Love this...I'll be featuring it at tomorrow night's Get Your DIY on party! I hope you can join us again with a handmade gift or two :)
ReplyDeleteI love this. Perhaps it could work with sheet music too?
ReplyDelete