Hello everyone.
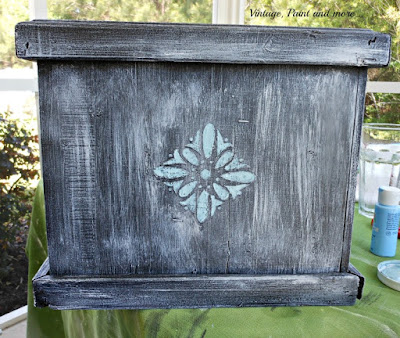
As you know we have been doing a little work outdoors getting things ready for summer and I have shared a few of those things with you over the last few weeks. Today I would like to share how I recycled an old cedar box I had into a pretty little planter with some paint and stenciling.
This cedar box was a gift from my son several years ago and has sit outside getting more and more weather beaten each year. This year it was headed to the trash as I thought it had seen better days. Then I decided to change try to save it so I grabbed a brush and some paint. As usual I started painting before I took a before picture.
However the first step of this project was to give the box two coats of paint with black chalkboard paint. I am in love with that paint right now and have been using it on everything.
It seemed a little plain so I decided to stencil a small motif on it. I taped the plastic stencil in place first.
Then I just filled the negative space of the stencil with a spackling compound.
You can see how it looks after I had filled it.
I removed the stencil immediately so I could remove any that got under it with a damp cloth. It didn't have to be perfect for this project because I wanted it to still look old and a bit worn.
After letting it dry overnight I used a very dry brush of a light grey paint I had lying around (Gravity by Valspar) and brushed over the entire box and stencil. This gave it an aged look but I still felt like it needed just a bit more.
So I decided to use some light blue craft paint to paint the motif itself. This gave the motif just the right amount of pop it needed.
It now sits on the patio with a small palm in it until I can decide what I want in it permanently. I really like how it turned out and that I was able to save it from the trash.
For a box that was headed for the trash it made a nice little planter that will last a few more years now.
What have you recycled lately? Are you still doing your gardening/yard work like we are or are you all done?
If you want to make sure you don't miss anything here be sure to sign up for my emails in the Hello bar at the top of this page.
Until next time - have fun creating something you love.
I will be linking up to the parties listed on the Where I Party page. Please go by and check out all the great projects and inspiration found at these.


Fabulous! Love the colors that you used! I just love it when old things can be made new again!
ReplyDeleteThanks for sharing your awesome project with us at Brag About It! I'm always looking forward to what you will be sharing with us next! Have a great week!
~Laurie
I really like how simple, yet efficient your planter box looks. The extra lip on the top and bottom of the box adds a nice simplified design quality. It would seem that adding thicker pieces of wood helps the box stand out just that much more.
ReplyDeletehttp://www.decor-4-u.com/np1-listing-dept-30020
Now that is an easy peasy DIY. Love it!
ReplyDeleteGreat colors! Love that the design has texture :)
ReplyDeleteLooks great Cathy! I have a few faded planters that could use refreshing--thanks for the inspiration!
ReplyDeleteThis is beautiful! Thank you for sharing this at Brag About It Link Party on VMG206.
ReplyDelete~ Megin of VMG206
This looks great. I have never used spackle like that. That's so cool.
ReplyDelete