Written by Cathy Carroll
Hi Everyone,
We are finally getting a little fall weather here - thrown in among some still very summer days. Today we were able to open the windows and let the wonderful fall beach breezes blow through the house. I have been busy getting a couple more fall projects done to show you but am winding down now. I thought I would bring you the tutorial for the lunch bag pumpkins I shared with you earlier this week as I have had several requests for it. ( It took me awhile to get the pictures taken and retaken as we have been having so many dark cloudy and rainy days. I had to get them as I could.)
I love the way these turned out. So rustic and so full of fun texture. I can see them being used a lot in the future as they can fit into any decor. This is an easy project to do and like most of my crafts takes very little time and very few supplies. You probably have most of them on hand.
You need will be needing:
- a Dollar Store pumpkin
- brown paper lunch bags - about 10 should do it
- a pair of scissors
- a glue gun and glue sticks
- a small amount of twine
- a book page
- That's it.
Start by cutting your paper bags into approximately 1 1/2 inch strips. This does not have to be precise and I did no measuring at all - just eyeballed it. I got about 5 cuts per bag.
After you have a stack of them cut - cut the strips in half as above.
Open each of these strips up and twist them individually. There really is no right or wrong to this just twist and crumple them to give them some great texture.
Here's a pile I did. As you can tell they are not neat - just crumpled and twisty.
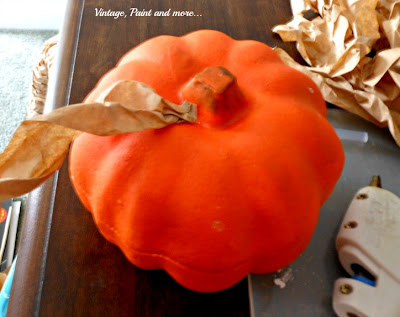
Now take one twisted crumpled strip of paper and glue one end on your pumpkin near the stem at the top.
Add a little glue down the side of the pumpkin and run the strip down twisting it to your desired look. I found the more crumpled and rough it was the better it looked. Then glue the other end to the underside of the pumpkin.
Continue gluing in this manner all around your pumpkin. You may have to come back and fill in some areas with strips where the orange shows through. I just pushed the strips around and glued as needed to make sure all the orange was covered. I did find that if I did a little bit of "crowding" by placing them very close together the outcome looked much nicer. You can see the more twisted and crumpled the strips are the better it looks.
When you are done gluing all the strips on use your little bit of twine to wrap the stem of the pumpkin and then add a couple of book page leaves. I drew my leaves free hand and cut them out - no template needed.
Here's the finished pumpkin. All rustic and ready to be added to almost any decor you use. I love it with pine cones, acorns and fall leaves. It looks great in a neutral setting or with other colors.
I placed a couple in this vignette with my bright oranges I am decorating with this year. What do you think? Maybe you would like to make a couple yourself?
What are you making for fall this year? I love hearing from you so tell me about it in the comments below. I answer all comments through email.
Until next time - enjoy creating something you love.
Hugs,
I will be linking up to the parties that are listed on the Where I Party page above. Go check them out - I promise you will enjoy all the great inspiration found at each one.


This is just so stinkin cute! i love that you did the twist of the bags. I am definitely putting this on my to do list for the next week or so!
ReplyDeleteThese are so cute... I will be making them soon. PInning.
ReplyDeleteGreat Tutorial...So Cute
ReplyDeleteYour pumpkins are so adorable!!! What a great way to recycle brown bags!
ReplyDeleteSo very clever and simply adorable! Love them!
ReplyDeletewow! Love this!
ReplyDeleteThese are adorable! I'm pinning this to try.
ReplyDeleteThis is so cool, I'll be pinning.
ReplyDeleteSuper cute Cathy! Pinning!
ReplyDeleteThat is a super clever idea! Stumbled, pinned and tweeted it too!
ReplyDeleteThese are adorable Cathy! I love neutral fall decor and these are perfect!
ReplyDeleteI highlighted your cool pumpkins!! and your tutorial on Centerpiece Wednesday tonight!
ReplyDeleteKarin
www.thestylesisters.blogspot.com
What a great idea. So creative.
ReplyDeleteShannon ~ bohemianjunktion.com
So cute! I would never think to do this. LOVE IT. Pinned and sharing on my FB page. :)
ReplyDeleteohhhh this paper bag pumpkin is so cute! so unique and such a great focal point! Appreciate the DIY tute too, now I need to make a few :) Thanks for sharing with us at the creative challenge!
ReplyDeleteWhat a fun project! Totally love the textured look to the finished product. :)
ReplyDeleteThis is just beautiful...I pinned it and I am going to give it a try! :) Pretty!
ReplyDelete